If you’ve ever ordered a 3D printed product or started exploring 3D printing yourself, you’ve probably heard the term “infill percentage.” It’s one of the most important settings in 3D printing, yet it’s also one of the most misunderstood.
Many people assume that a higher infill percentage automatically means a stronger part. While that’s partially true, the reality is much more nuanced.
Let’s break down what infill percentage actually means, how it affects strength, and when increasing it is worth the extra material and print time.
What Is Infill?
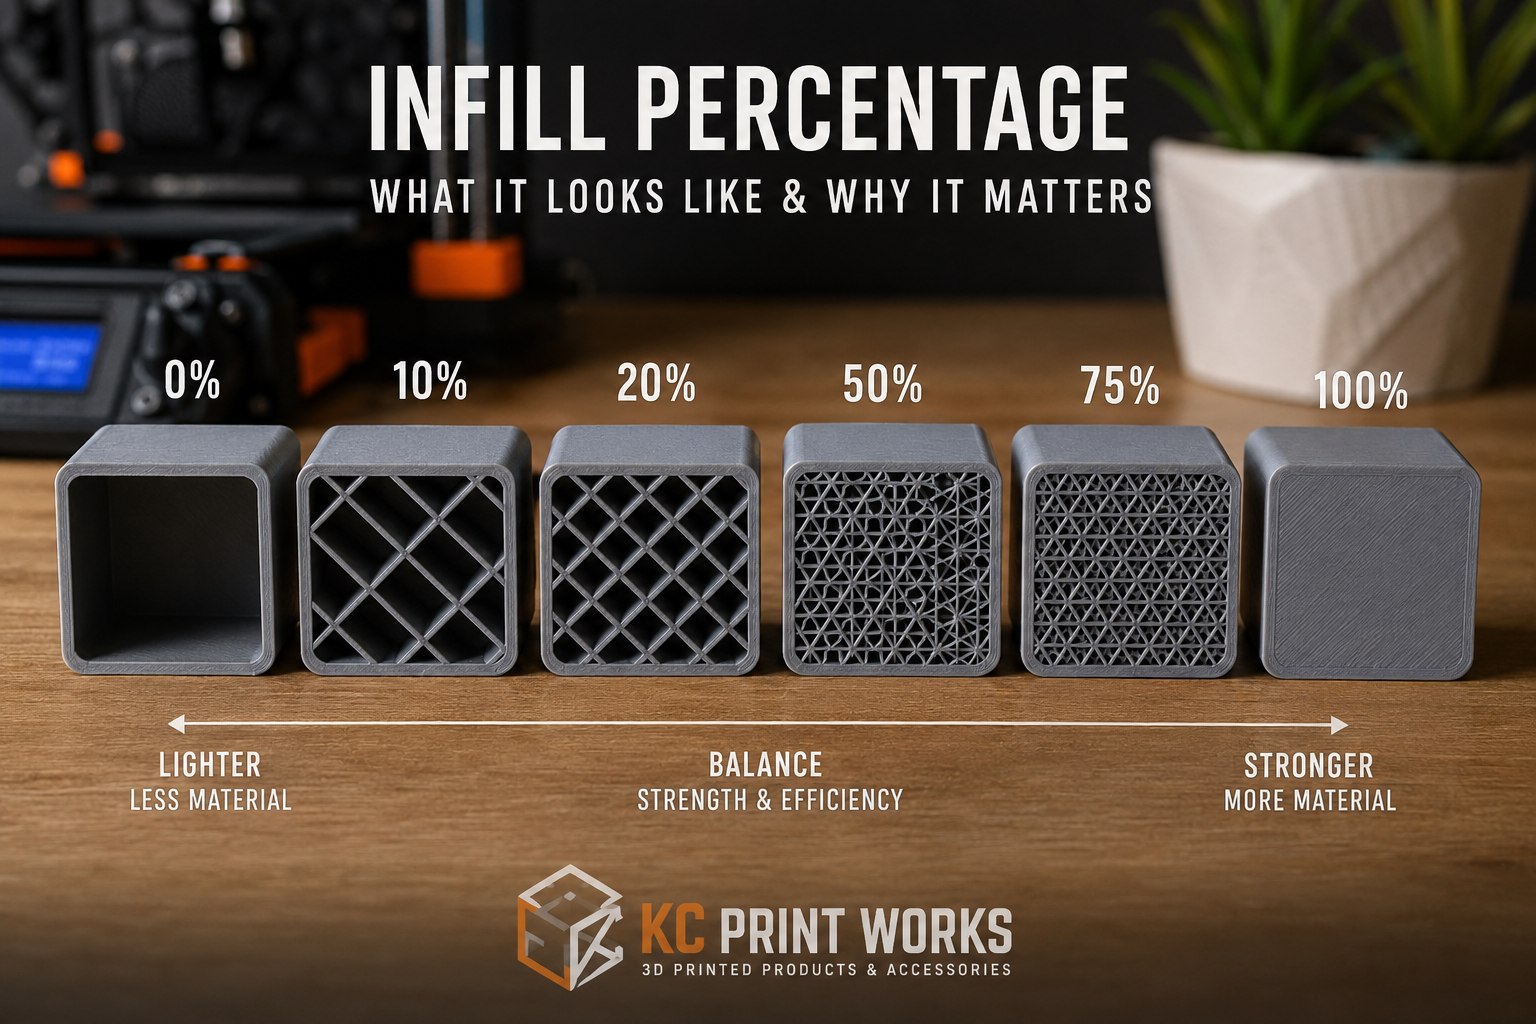
Infill is the internal structure printed inside a 3D model. Instead of printing every object completely solid, most 3D prints use a patterned internal framework surrounded by solid outer walls.
Think of it like the framing inside a house. The walls and roof provide the exterior shape, while the internal structure provides support and strength.
The amount of that internal structure is measured as a percentage.
- 0% infill: Completely hollow
- 10% infill: Very lightweight internal structure
- 20% infill: Common balance of strength and material savings
- 50% infill: Strong functional parts
- 100% infill: Completely solid print
What Does the Percentage Actually Mean?
Infill percentage refers to how much of the interior volume is filled with material.
For example:
- A print at 10% infill has an internal structure that occupies roughly 10% of the available internal space.
- A print at 50% infill contains significantly more internal material and support.
- A print at 100% infill has virtually no empty space inside.
However, because infill is created using geometric patterns such as Gyroid, Cubic, Honeycomb, or Grid, the relationship between infill percentage and strength is not perfectly linear.
Doubling the infill percentage does not necessarily double the strength.
Why More Infill Isn’t Always Better
This is one of the biggest surprises for new makers.
Research and real-world testing consistently show that increasing infill beyond a certain point provides diminishing returns.
Many industry experts and slicer developers recommend 10–20% infill for most everyday prints, as it provides an excellent balance between strength, print time, and material usage. Prusa Research’s testing has also found that most models rarely benefit from infill densities above 40%.
For many functional parts, increasing wall thickness often adds more strength than simply increasing infill density.
Typical Infill Recommendations
5%–10% Infill
Best for:
- Decorative items
- Display models
- Lightweight cosplay props
- Low-stress organizational tools
Benefits:
- Fastest print times
- Lowest material consumption
- Very lightweight
15%–25% Infill
Best for:
- Everyday household items
- Storage boxes
- Card game organizers
- Most Etsy products
- Functional accessories
Benefits:
- Excellent strength-to-weight ratio
- Efficient material use
- Reliable performance for daily use
This range is often considered the “sweet spot” for FDM printing.
30%–50% Infill
Best for:
- Mechanical parts
- Tool holders
- Mounting brackets
- Heavy-use functional prints
Benefits:
- Increased rigidity
- Better compression resistance
- Improved durability
75%–100% Infill
Best for:
- Specialty engineering parts
- Components exposed to extreme loads
- Parts where added weight is beneficial
Drawbacks:
- Significantly longer print times
- Much higher material usage
- Often only modest strength improvements compared to lower percentages
Interestingly, some studies have found that maximum impact resistance may occur below 100% infill because fully solid parts can sometimes allow cracks to propagate more easily.
Infill Pattern Matters Too
Infill percentage is only half the story.
The pattern used inside the print can dramatically affect strength.
Some common options include:
Gyroid
One of the most popular modern infill patterns.
Advantages:
- Excellent strength-to-weight ratio
- Strength in multiple directions
- Efficient material usage
Cubic
Great all-around strength.
Advantages:
- Strong support in multiple axes
- Ideal for functional parts
Grid
Fast and simple.
Advantages:
- Easy to print
- Good for general-purpose models
Honeycomb
Classic pattern with good structural support.
Advantages:
- Strong and visually appealing
- Good weight distribution
Many modern slicers default to Gyroid or Cubic because they provide excellent strength without requiring excessive material.
The Secret to Stronger Prints
Here’s a tip many beginners miss:
Adding more walls, also called perimeters, often improves strength more effectively than increasing infill.
The outer shell handles much of the stress in a printed object. Increasing wall count from two walls to four walls can often provide a bigger strength improvement than raising infill from 20% to 50%.
When strength matters, consider:
- Increasing wall count
- Using a stronger material
- Choosing a better infill pattern
- Then increasing infill percentage if needed
What We Use at KcPrintWorks
For many of our storage boxes, organizers, and game accessories, we typically use infill settings designed to balance:
- Durability
- Material efficiency
- Print quality
- Long-term reliability
Rather than simply maxing out infill percentages, we optimize wall thickness, infill pattern, and infill density together to create products that are strong, practical, and cost-effective.
After all, a well-designed 20% infill print can often outperform a poorly designed 50% infill print.
Final Thoughts
Infill percentage is one of the most important settings in 3D printing, but it’s not a simple “higher equals better” equation.
For most prints:
- 10–20% infill is more than enough.
- 20–40% handles most functional applications.
- 50%+ is only necessary for specialized use cases.
The strongest print isn’t always the one with the most plastic inside. It’s the one designed with the right combination of walls, infill pattern, material, and print settings.
Understanding how infill works helps you create stronger parts, reduce waste, and get the most value from every print.
Sources
- Prusa Research – Everything You Need to Know About Infills
- Prusa Knowledge Base – Infill Settings Guide
- UltiMaker – Infill Density: Optimizing Strength and Speed
- All3DP – Strongest Infill Patterns for Maximum 3D Print Strength
- Raise3D – Infill 3D Printing: Patterns, Density and Issues
- The Virtual Foundry – Shells and Infill Analysis